It starts as a tiny black speck on your cheek. You don’t think much of it until you look in the mirror after a long listening session and realize you look like you’ve been working in a coal mine. That’s the "Beats dandruff." If you own a pair of Beats Studio 2, Studio 3, or even the newer Studio Pro, you know exactly what I’m talking about. The protein leather—which is basically a fancy marketing term for synthetic polyurethane—starts to crack, peel, and eventually disintegrates into a mess of sticky black flakes. It’s annoying. It feels cheap. But honestly, it’s also one of the easiest tech repairs you can do yourself without sending $350 headphones to a landfill.
Most people think they need to buy a whole new headset. Please don't do that. The drivers in your Beats Studio are likely perfectly fine, and the battery probably still holds a decent charge. The issue is purely tactile. When the sweat from your skin and the oils from your hair sit on that synthetic leather, they break down the chemical bonds. Over time, the material loses its elasticity and just gives up.
The Reality of Why Beats Studio Ear Pads Fail
Let's get into the weeds for a second. Apple (which owns Beats) uses a specific type of high-density memory foam wrapped in that aforementioned protein leather. It’s designed for immediate comfort in a store—that "pillowy" feel—rather than decade-long durability. If you use your Studio 3s at the gym, you’re basically fast-tracking the destruction of your ear pads. Salt is a nightmare for these materials.
I’ve seen people try to "save" their pads with electrical tape or even duct tape. It’s a disaster. Not only does it look terrible, but it ruins the acoustic seal. Beats Studio headphones rely heavily on that seal for their Active Noise Cancelling (ANC) to function correctly. If air is leaking through a crack in the cushion or a gap in the tape, the internal microphones will struggle to phase out external noise. You’ll hear a low-frequency hum or "hiss" because the feedback loop is broken. Replace the pads, and the ANC magically gets better.
Picking the Right Material: Is Leather Better?
When you go looking for replacements, you’ll see a million options on Amazon or specialty sites like Wicked Cushions or Dekoni Audio. You’ve basically got three choices:
The Original Style (Protein Leather) is what came in the box. It's soft and looks "factory," but it will absolutely peel again in 18 to 24 months. If you like the original look and don't mind a recurring $20 maintenance fee every two years, stick with this.
Then you have Sheepskin Leather. This is the upgrade. Real leather is porous. It breathes better than plastic, and instead of peeling, it develops a patina. It’s more expensive—usually double the price of synthetic—but it lasts significantly longer. The trade-off? Some people find it a bit warmer on the ears during long sessions.
Finally, there’s Cooling Gel or Velour. These are popular with gamers. Brands like Wicked Cushions make "Freeze" versions that have a layer of cooling gel under the fabric. If your ears get sweaty after twenty minutes, these are a godsend. However, be warned: fabric pads change the sound profile. They tend to let more bass "leak" out, so your Beats might sound a little less punchy than you're used to.
How to Do the Swap Without Breaking Anything
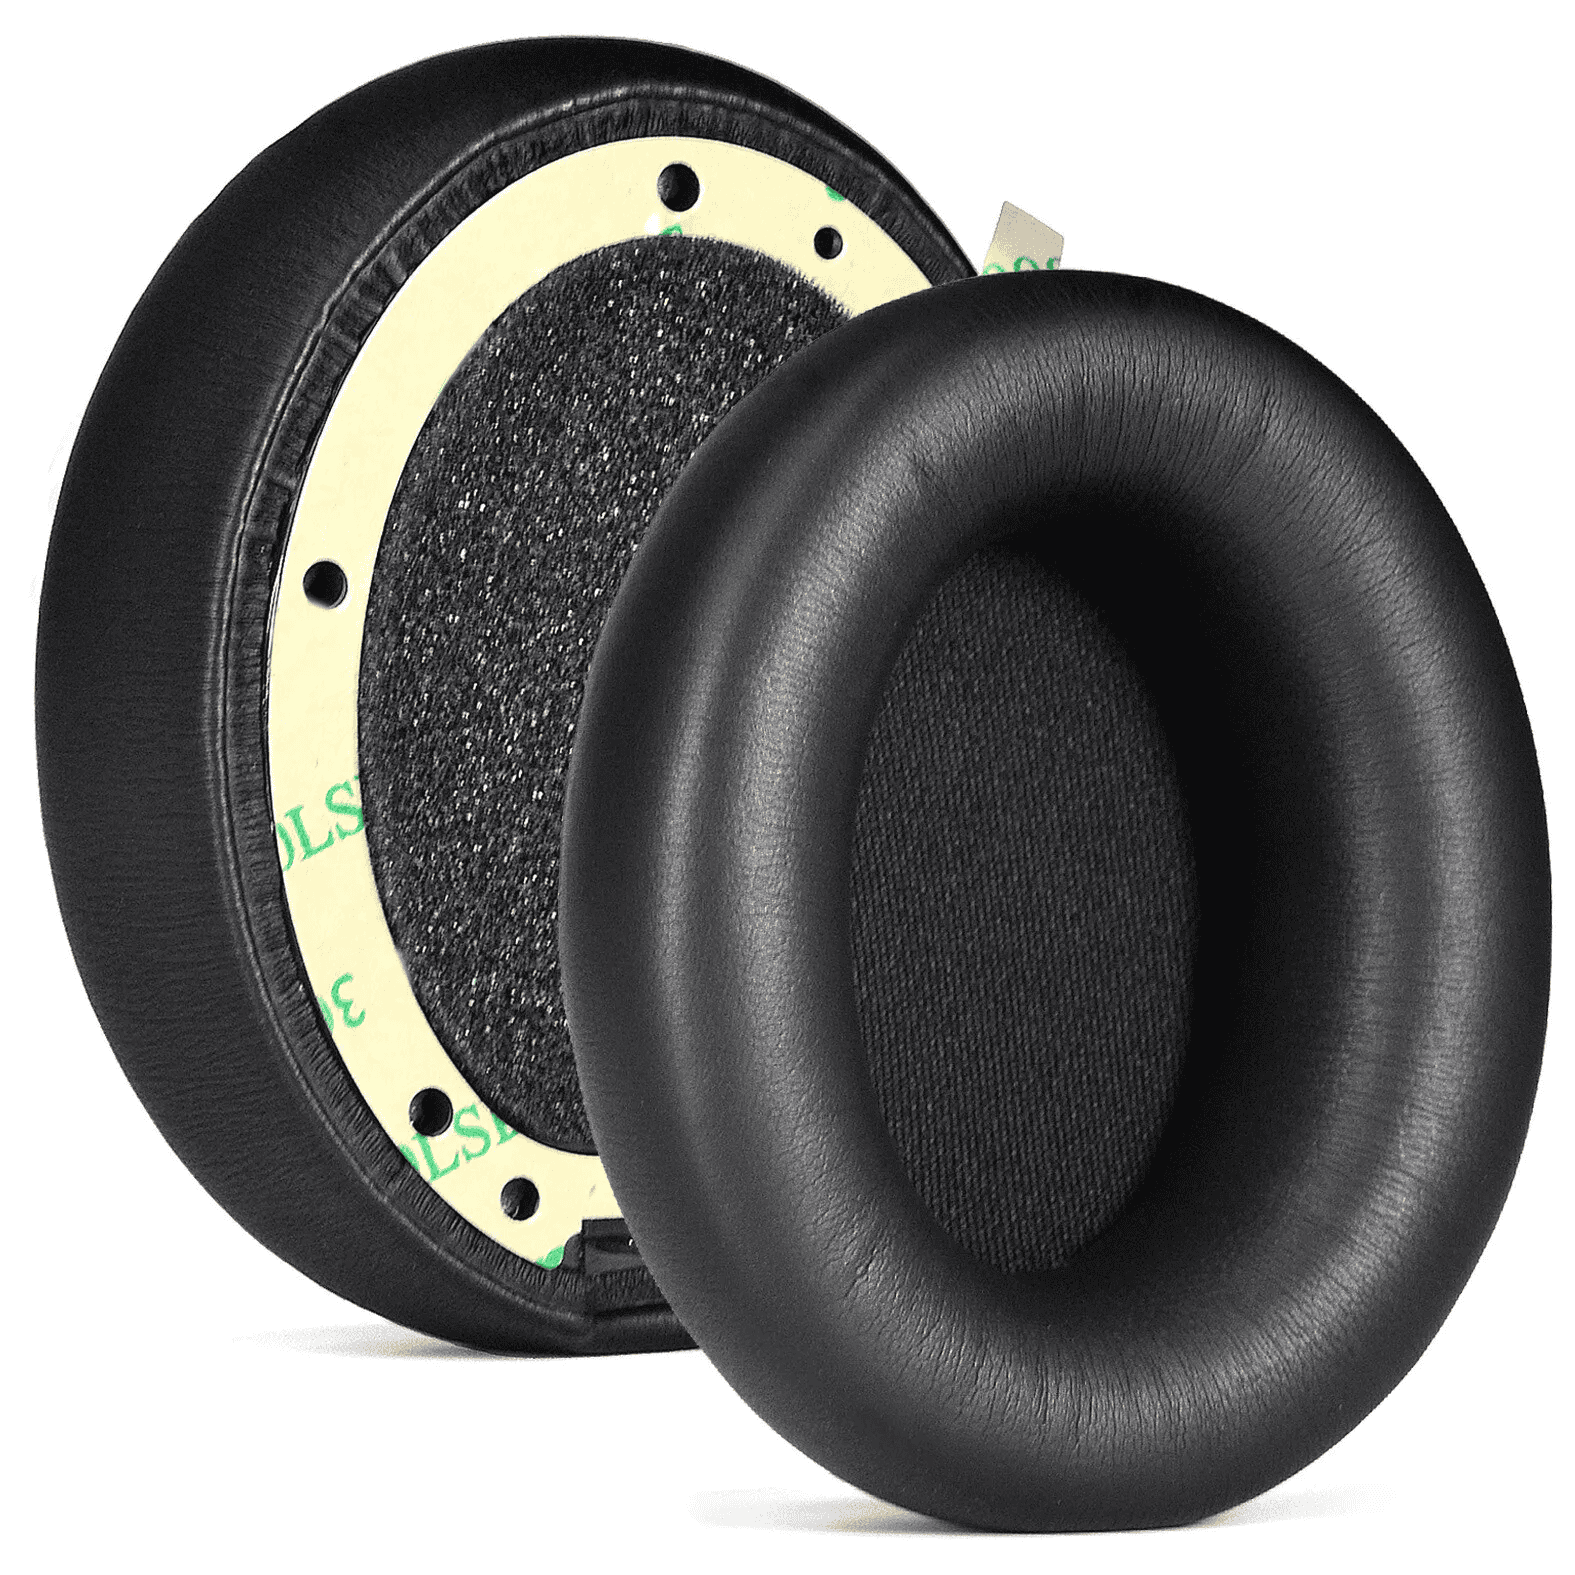
The Beats Studio 2 and 3 use an adhesive system. There are no clips. This is both a blessing and a curse. It means the repair is simple, but it also means you have to be careful with the "clean-up" phase.
First, you need a flat tool—a butter knife works, but a plastic guitar pick or a specialized prying tool is safer. You have to slide it between the plastic cup of the headphone and the base of the ear pad. Be gentle. You're trying to break the bond of the 3M tape. Once you get a corner up, you can usually peel the rest off with your hands.
The most important step that everyone skips: You must get the old residue off. If you leave bits of old tape on the plastic, the new pads won't stick properly and will fall off in a week. Use a little bit of isopropyl alcohol (70% or higher) on a microfiber cloth. Rub the plastic ring until it’s smooth and clean. If you don't have alcohol, even a little bit of nail polish remover (acetone-free!) can work in a pinch, but be careful not to get it on the outer finish of the headphones.
Alignment Matters More Than You Think
Check the pads before you stick them on. One pad has a notch in it. That notch is for the USB charging port or the 3.5mm jack. If you put the wrong pad on the wrong side, or upside down, you won’t be able to charge your headphones. It sounds like a "no-brainer" mistake, but I've seen it dozens of times.
Once the tape is on, don't just put them on your head and go. The adhesive needs "dwell time." Put the headphones on a stack of books or use a rubber band to squeeze the ear pads against the cups for about an hour. This ensures the pressure activates the adhesive bond.
What About the Beats Studio Pro?
If you have the newer Studio Pro (the ones released in 2023), the situation is slightly different but mostly the same. Apple improved the foam density, but the outer skin is still prone to the same environmental degradation. The removal process is identical. The main difference is the internal sensor placement; just be mindful not to poke your prying tool too deep into the speaker grill.
Does it Void the Warranty?
Technically, replacing ear pads is considered "user maintenance" in many regions, but Apple doesn't officially sell replacement pads to consumers—they want you to pay for a mail-in repair. However, since there are no screws and you aren't opening the electronics, it’s a very low-risk "mod." If you ever need to send them in for a battery issue under AppleCare+, they likely won't even notice the pads are third-party unless you chose a bright neon color.
Actionable Steps to Make Your New Pads Last
So, you've spent the $20 and thirty minutes to fix your gear. How do you keep from doing this again in six months?
- The Post-Gym Wipe: This is the big one. If you sweat, take a damp (not soaking) cloth and wipe the salt off the pads immediately. Salt is a solvent for synthetic leather.
- Avoid Hair Products: If you use heavy hair wax or oils, those chemicals transfer directly to the top of the pads. Try to keep a barrier or at least wipe the pads down weekly.
- Storage: Don't leave your Beats in a hot car. The heat softens the adhesive and causes the protein leather to bubble. Keep them in the case when you aren't using them.
- Choose Hybrid Materials: If you're a heavy user, look for "Hybrid" pads that have leather on the outside (to keep the sound seal) but fabric on the face (the part that touches your skin). This is the best of both worlds for durability.
Fixing your Beats Studio ear pads is a satisfying Saturday afternoon project. It saves you money, keeps electronics out of the trash, and honestly, the third-party pads are often more comfortable than the ones Apple ships. Just take your time with the adhesive cleanup and you’ll have a "new" pair of headphones for the price of a couple of burritos.
Next Steps for Your Repair:
- Identify your specific model (Studio 2 and 3 are identical in pad size; Studio Pro is slightly different).
- Check for the USB port cutout on the replacement pads before removing the adhesive backing.
- Use a plastic prying tool to avoid scratching the headphone's finish.
- Apply firm pressure for at least 30 minutes after installation to ensure the adhesive sets.